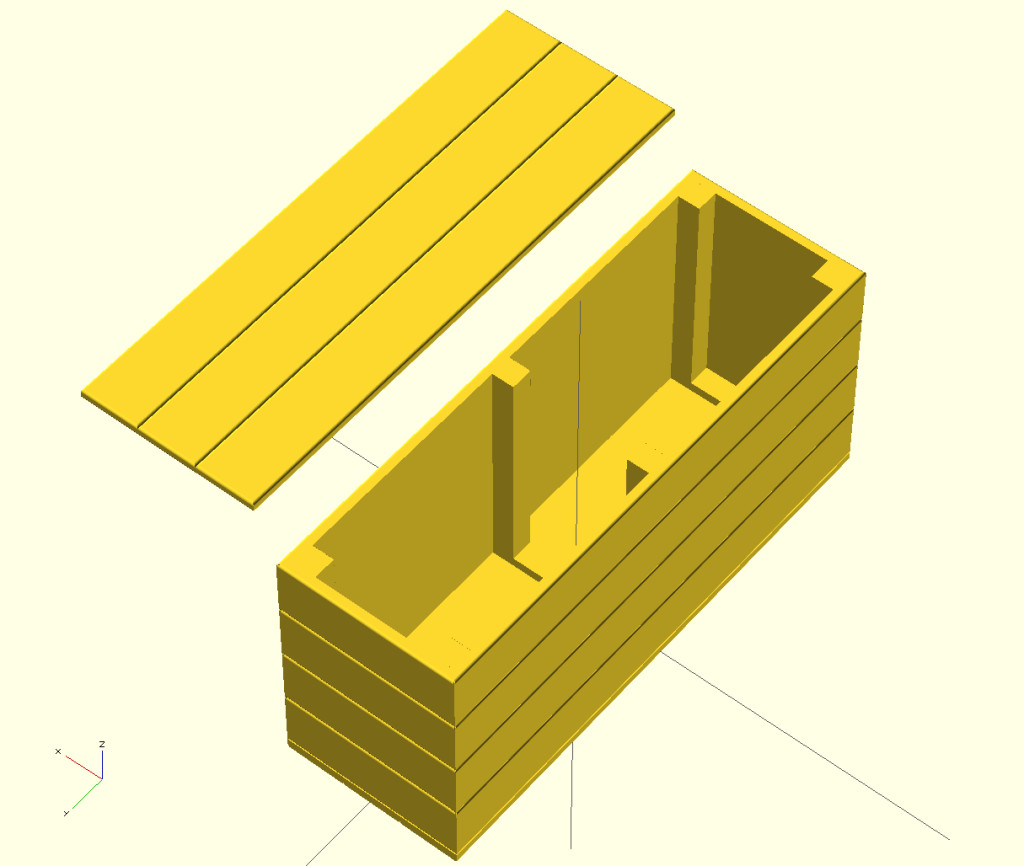
We are a little short on storage space in our house so the solution I decided on is a storage ottomon (or chest – however you want to refer to them) for the bedroom, they’re very handy for storing sheets/towels/jumpers/etc. really any large volume items. At this point I’m also planning a double bed to match the Ottomon.
Tooling
This was a very simple design – no complicated hand chiselled joints – just power tools! I knocked this together in a day (albeit a fairly long day!)
So I used:
- Power drill,
- Router – with round-over bit,
- Sliding mitre saw,
- Random orbit sander.
Along with a workbench and a couple of clamps (to aid in the construction phase).
Design
I’m big fan of the simple panelled design – which also ties in very nicely with the style of bed I have in mind. The panelled design also makes it infinitely easier to make – especially compared to some earlier designs I had in mind with an external frame!
So it basically involves wrapping some boards (with rounded over edges) around a ‘U’ shaped frame:
Making a couple of sides transparent makes in the internal frame easier to see:
Dimensions
The overall dimensions are 1060 mm wide x 360 mm deep x 450 mm tall.
This provides a substantial amount of internal space while the structure is also solid enough to sit on.
Main components:
- The outer boards are 20 x 120 mm,
- The supports are 44 x 44 mm,
- The batons connecting the support beams at the bottom (and the boards for the lid) are 20 x 44 mm.
From what I remember (I bought some wood for another project at the same time) all the wood for this ottomon cost between £50 and £60.
Construction
Again the exploded views are a little more illustrative:
 The ends of the boards for the side panels have been mitred to 45 degrees to hide the joints at the corners of the ottomon. The outer edges of the boards have been rounded over to give the panelled look. The sides and ends of the lid panels have been rounded over top and bottom (excluding the bottom internal edges) this gives a smooth finish and also a lip to lift the lid off with.
 Everything in this is simply butted together and screwed with self-tapping screws for ease – if you order these in bulk or pick them up from a timber yard you will save a fortune over B&Q!. For instance self-tapping screws in B&Q you’re looking at a few pounds for a pack of 10, at the timber yard you’ll pay a few pounds for a box of 200!
Starting with laying out the base panels and the batons at the bottom, align the bottom row of panels so the sides are flush and the screw through the batons into the base panels. Then add the support beams to the batons, and screw through from the outer panels into the support beams. When the bottom row of panels are attached the unit can be flipped upside down (note the support beams and side panels are not actually attached the base yet) and screw through the base directly into the support beams. Then progressively add the side panels layer by layer. The top 3 boards are simply held together by the 3 batons, just make sure you offset the batons with respect to the support beams or the lid won’t actually fit on the box.
Finishing
To finish this was progressively sanded to 120 grit, then stained once with Mann’s Medium Oak pine stain – if you’ve read any of the other projects you might realise I’m a massive fan of this colour! It also comes in about 50 over shades too.
After staining several coats of Mann’s Extra Tough Satin Varnish (with buffing in between to smooth off the finish).
The final result:


